

Whole turkey with oranges and rosemary is seriously delicious. This is a super easy turkey recipe where the flavors blend magically, giving you a delicious, impressive turkey without any hassle.
Jump to:
- Why You’ll Love This Orange Turkey With Rosemary
- Ingredient Information and Substitutions
- How To Thaw A Turkey
- Brining A Turkey
- How To Prep A Turkey
- How To Slow Roast Turkey
- How to Carve a Turkey
- Frequently Asked Questions and Turkey Troubleshooting
- What Do I Make With Turkey Leftovers?
- Other Delicious Roast Turkey Recipes
- Hosting Thanksgiving?
- Turkey with Oranges and Rosemary
Why You’ll Love This Orange Turkey With Rosemary
The first time I tried cooking a turkey I was so nervous that I accidentally brought a grapefruit to stuff it with instead of the orange my mom told me to get (she basically coached me through that first turkey, and let me just say, the grapefruit did add fantastic flavor!).
But today I am here to make it all easier for you. If you've never cooked a turkey before, it can seem a little bit intimidating. Believe me when I say, I was in your shoes (as you may have gathered above)! That’s the beauty of this recipe- it's a super simple and outrageously delicious turkey recipe you’ll always want to come back to.
Here’s why you should make this:
- Great beginner recipe
- Awesome flavors that compliment turkey
- Major crowd please
- Tons of great leftovers
- Looks show-stoppingly gorgeous
Since this is so beginner friendly, I’m also going to share the basic A-Z of making a turkey so you’ll know everything you need to know for total turkey success! Let’s go!
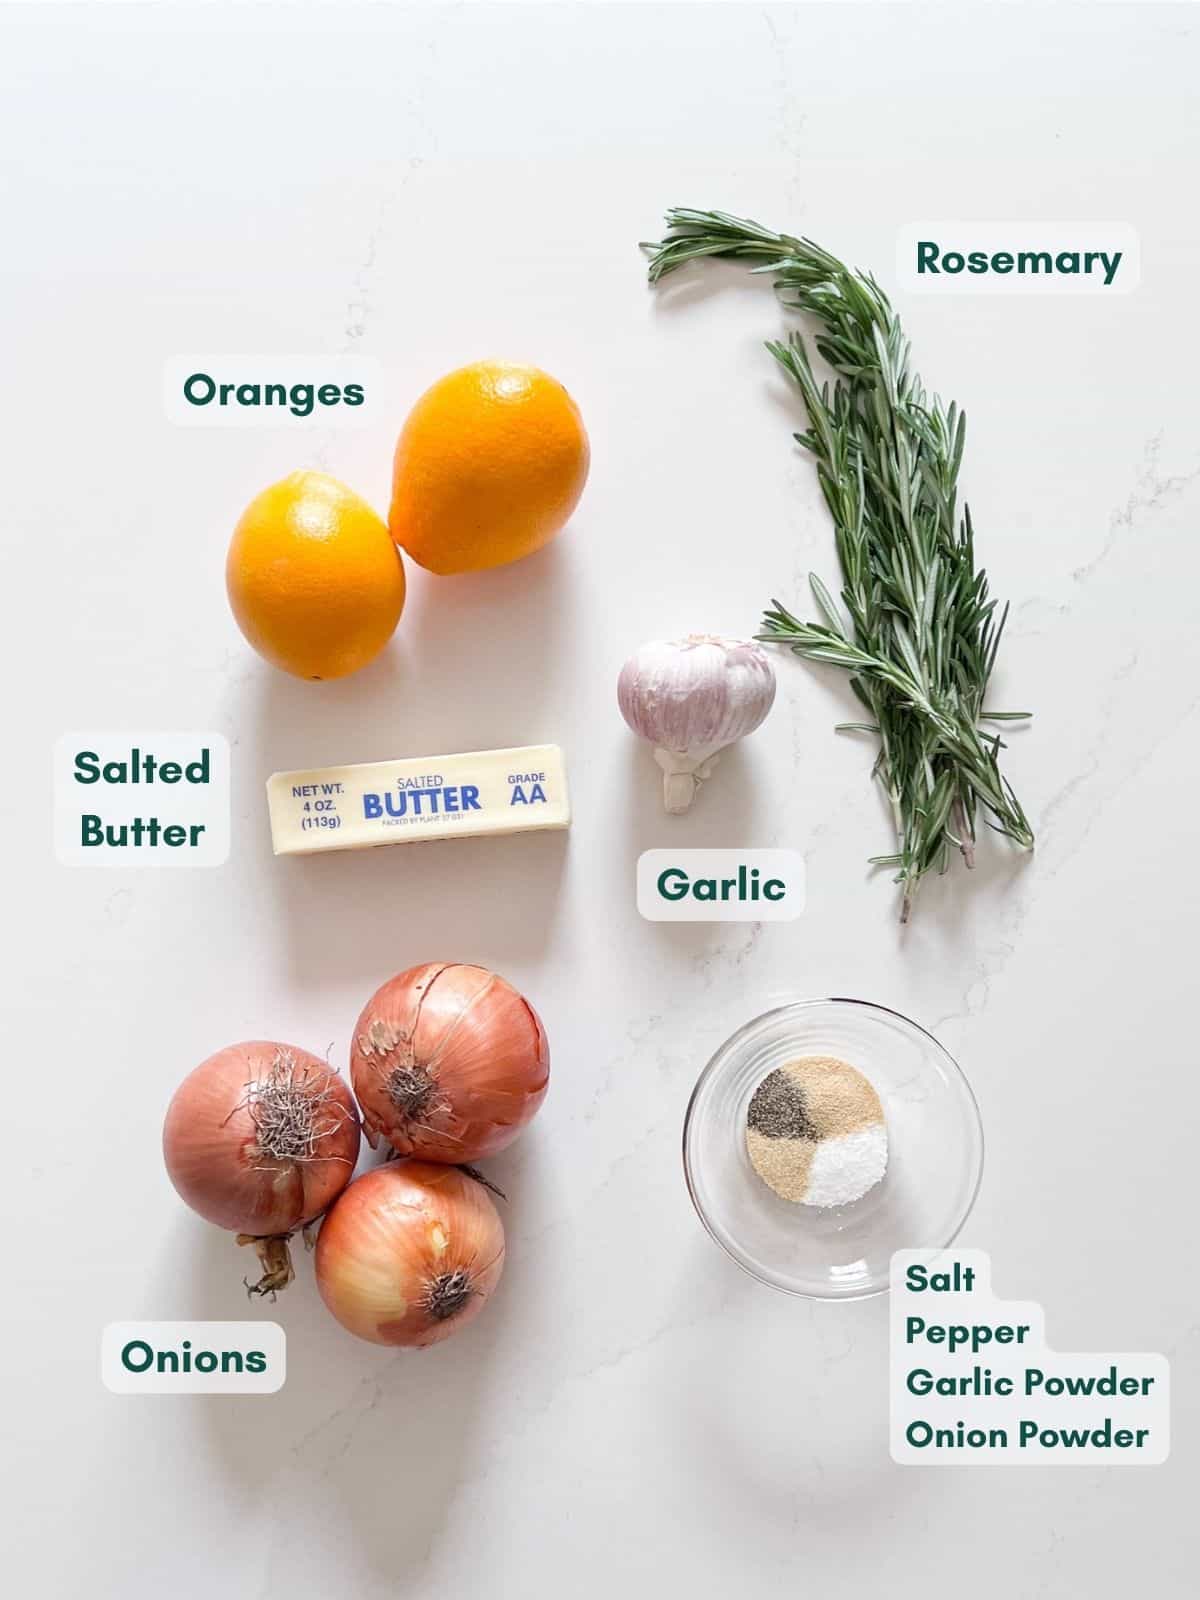
Ingredient Information and Substitutions
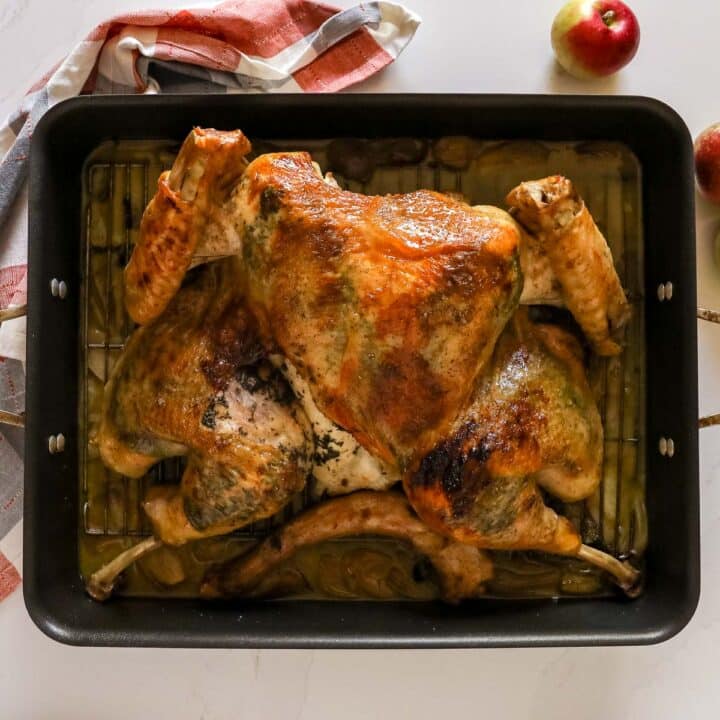
- Whole Turkey- Now, I’ll be honest- I prefer a spatchcocked bird. I wrote an entire post on why and how to spatchcock a turkey, but the main reason is it cooks quicker and more evenly for a juicier bird. That post will show you how to do it but you can also ask your butcher to do it for you. I wrote this recipe for a 15 pound turkey but you can always alter it for a smaller or larger bird. I
- Brine- If roasting the whole bird without butterflying, you can submerge in a brine of water, Kosher salt, brown sugar, rosemary, orange and bay leaf for a juicier and more flavorful bird. If spatchcocking, this is not necessary.
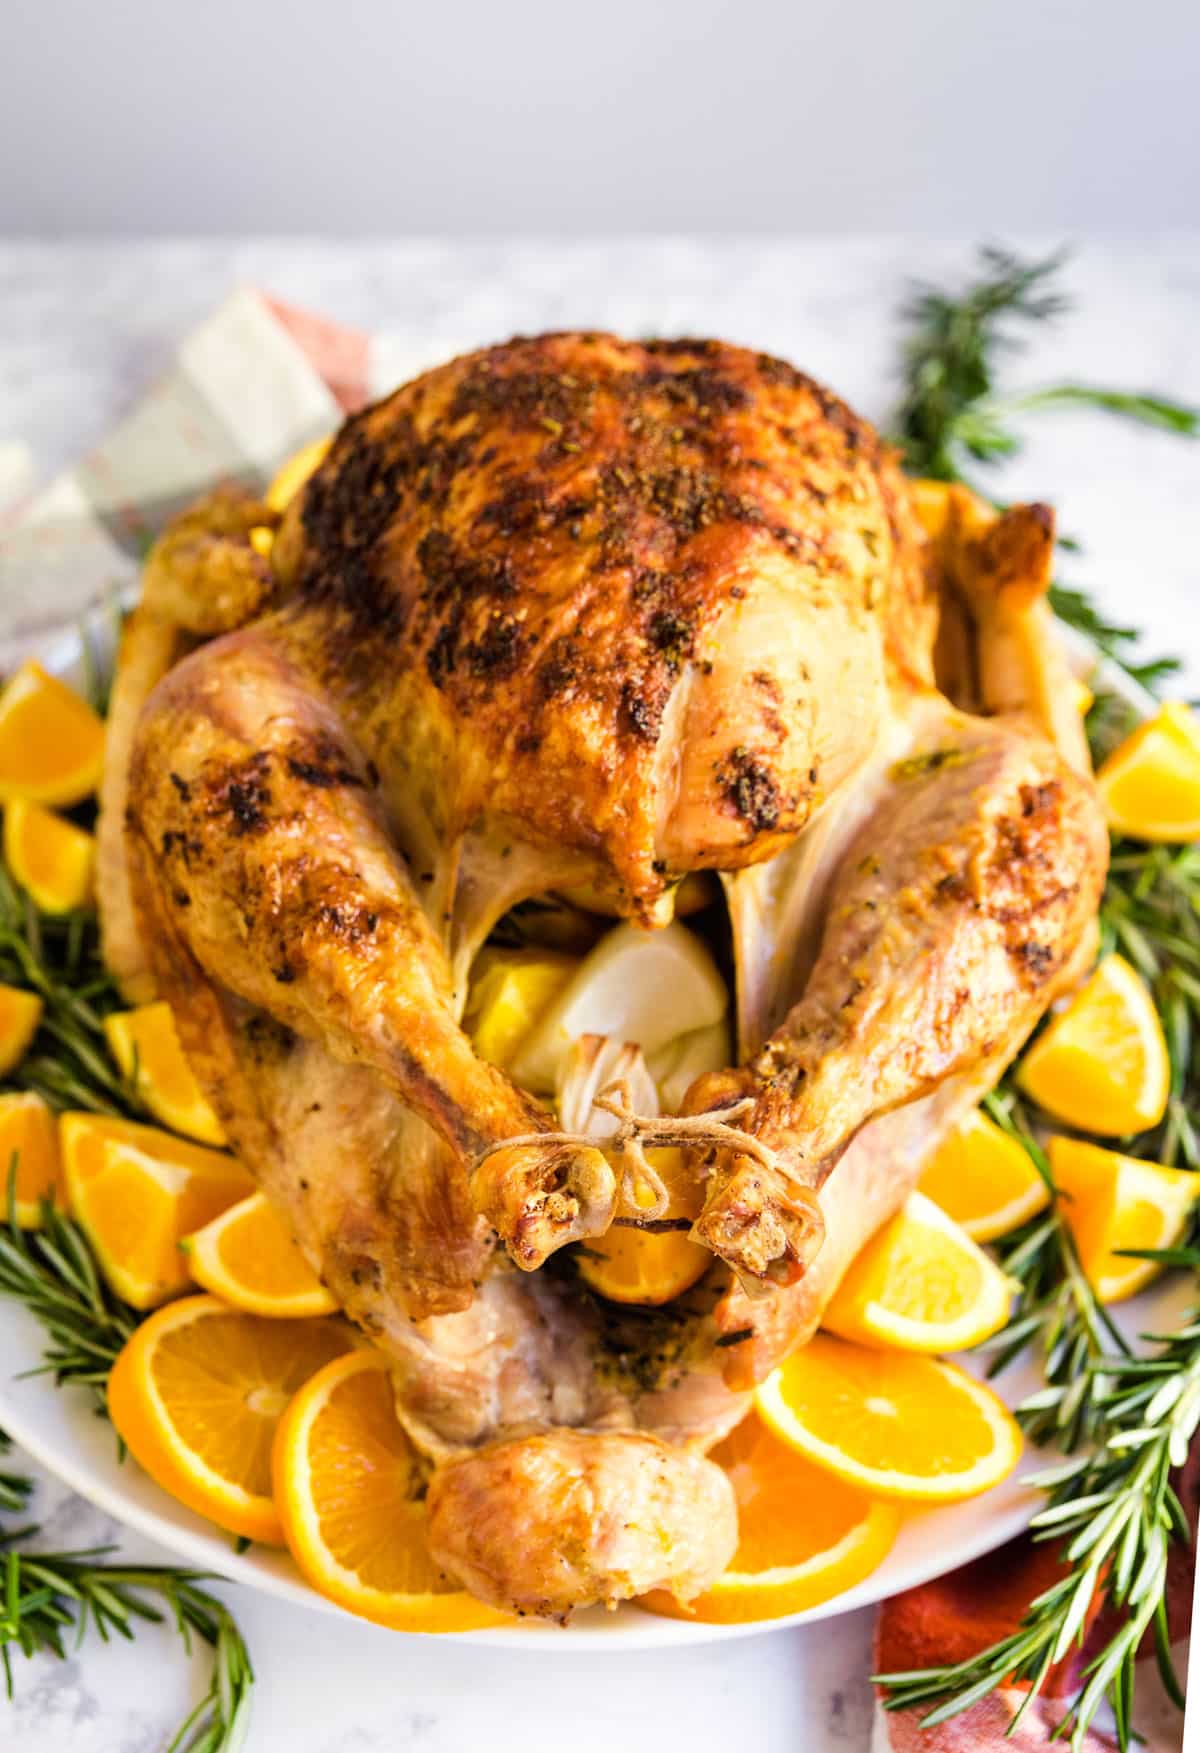
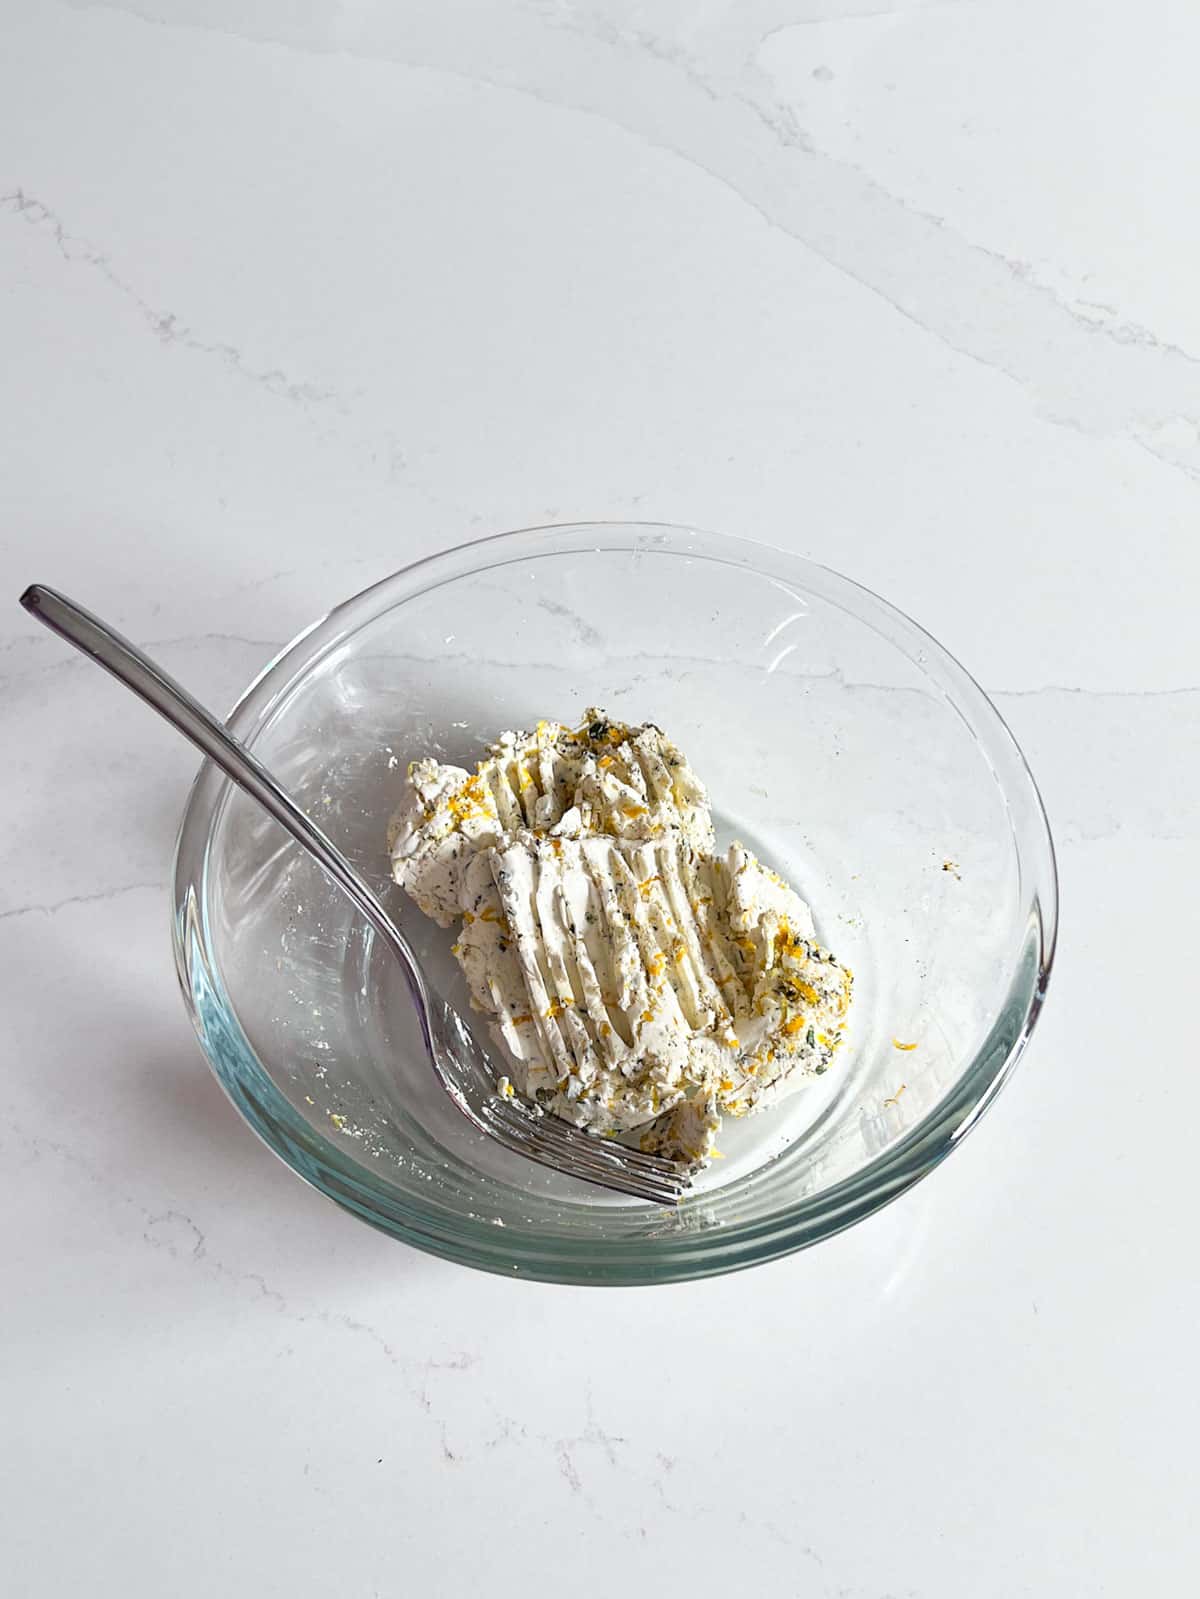
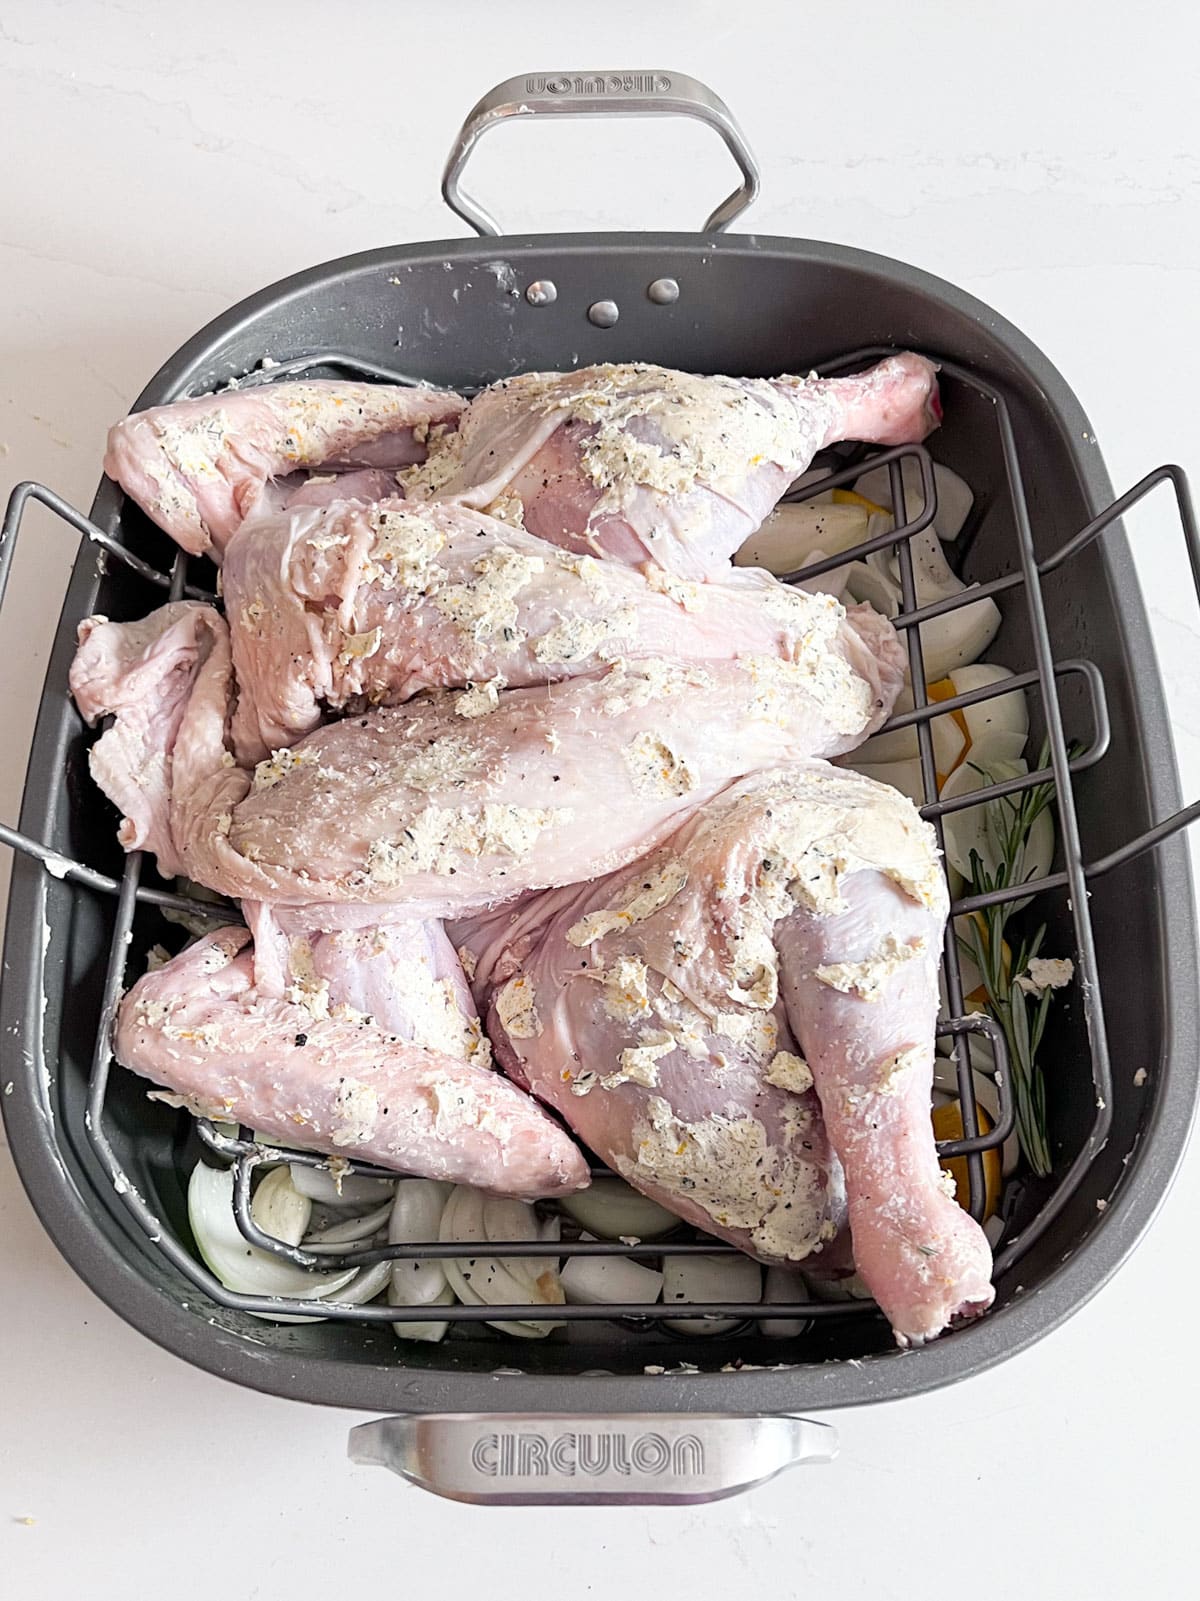
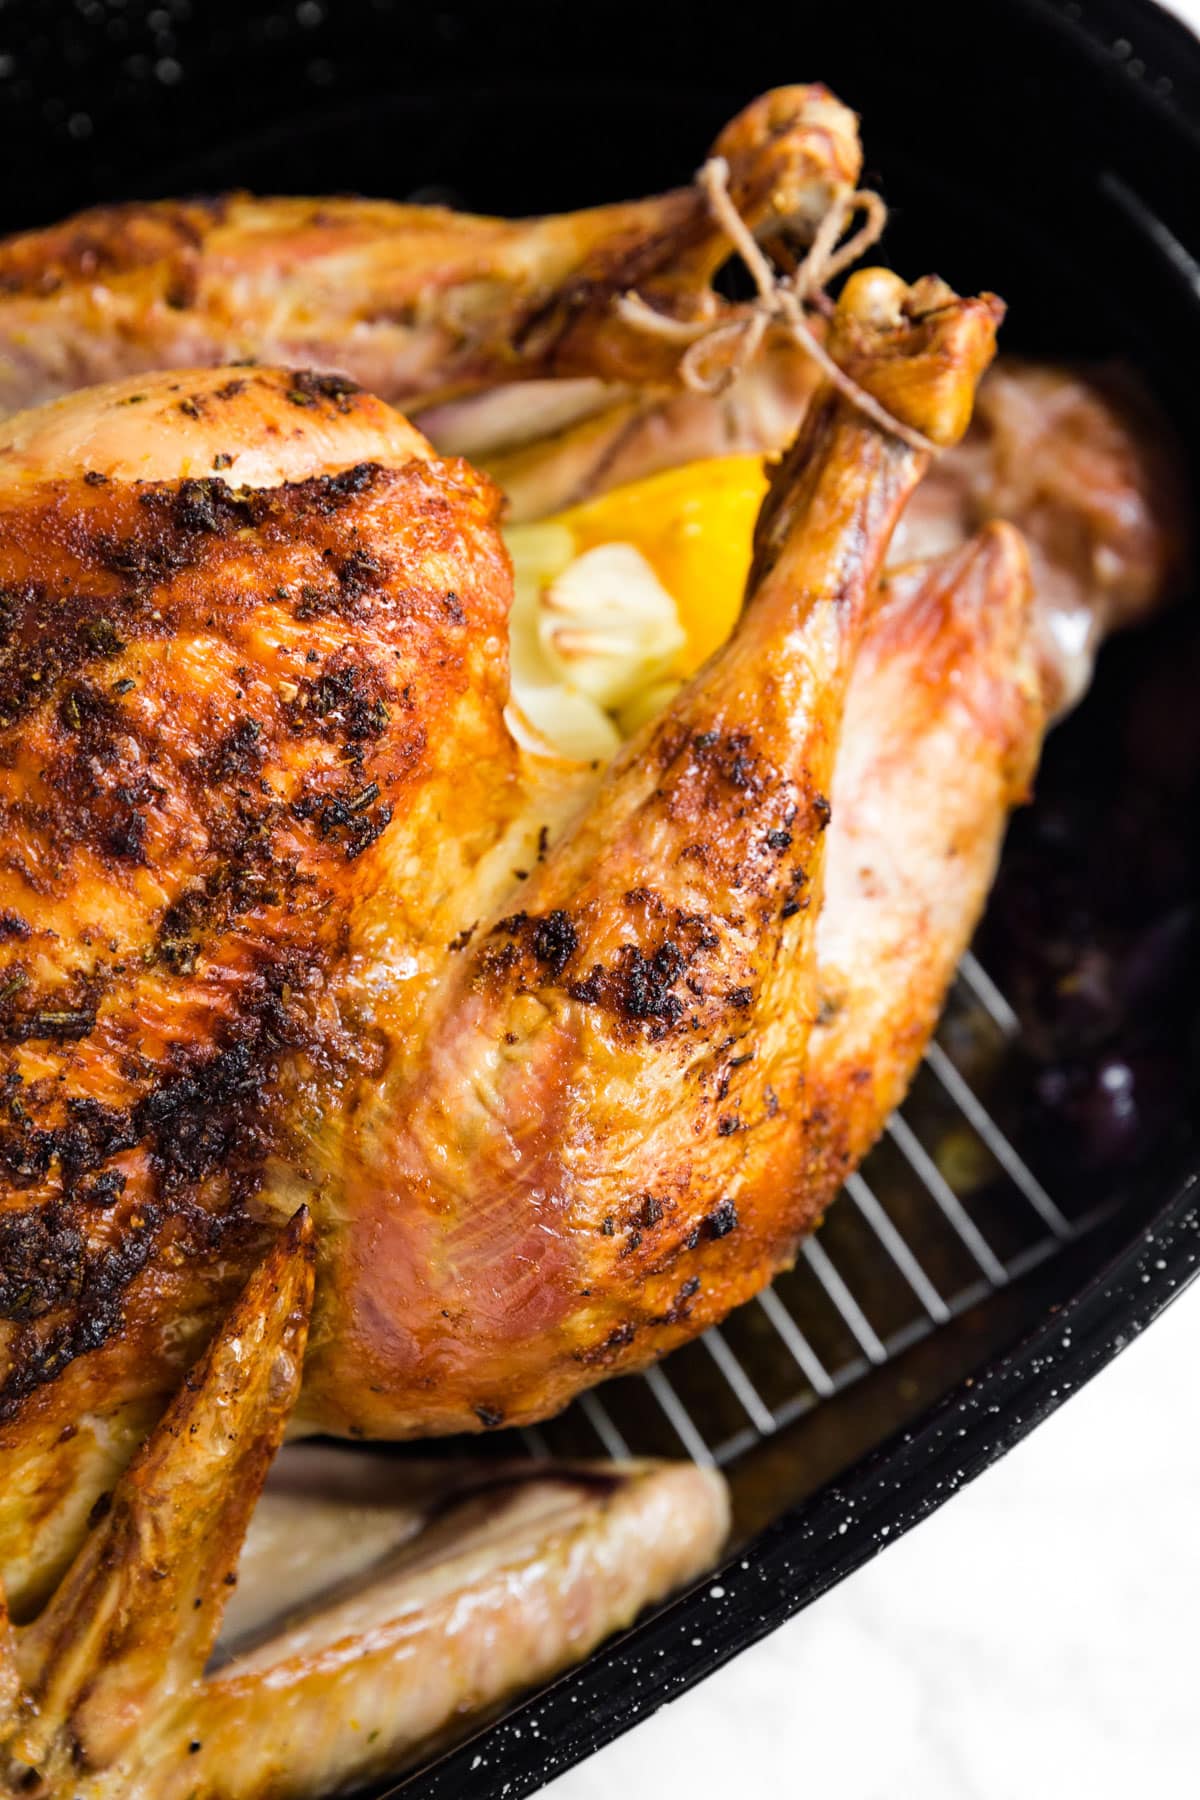
- Compound Butter- Salted butter, Kosher salt, black pepper, garlic powder onion powder, rosemary and orange zest make for a perfectly flavored and delicious turkey.
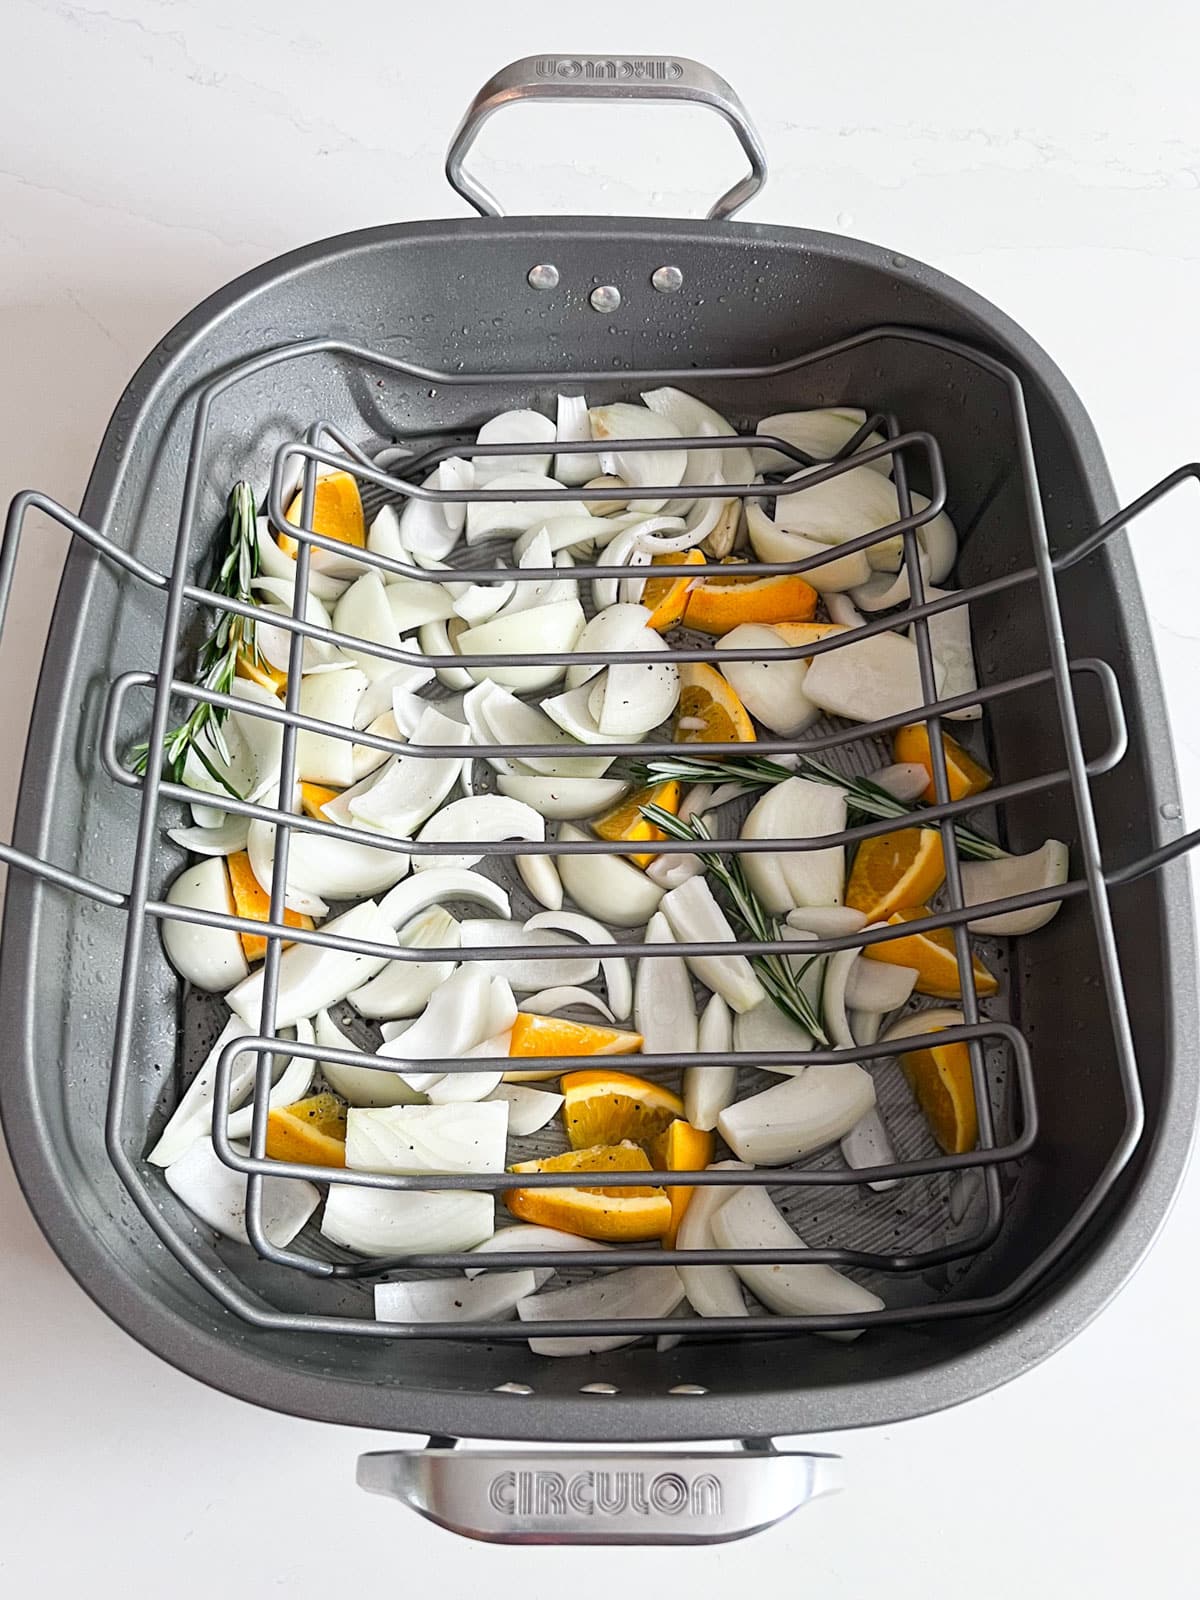
- Prepping The Pan and Turkey- I always prep my pan with a layer of onions, garlic, rosemary and oranges with a some water. I also place onions, garlic oranges and rosemary into the cavity of the bird after seasoning it with salt and pepper. These help make delicious drippings that can be mixed with additional Turkey Broth and thickened into your gravy while the bird rests.
How To Thaw A Turkey
The safest way to defrost a turkey is in the refrigerator. You'll want to plan for around 4 pounds thawing per day, so a 16 pound bird will need 4 days in the refrigerator (the USDA tells us its 5 pounds per day, but better safe than sorry!). Here are some things to keep in mind:
- Thaw it on the bottom shelf and keep it well wrapped to avoid cross-contamination.
- Place the bird breast side up in the back of the fridge to avoid temperature fluctuation. You'll know it’s breast side up because the drums face the top and the wings on the other side are toward the bottom.
- Be sure to cook it within 4 days of thawing.
Brining A Turkey
I’ve seen many debates on whether or not to brine a turkey and I’ve made many turkeys with and without brines, with great success both ways. I typically don’t brine my turkey if I’ll be spatchcocking it because I don’t think it’s necessary in that case since the bird cooks more quickly evenly and tends to be more juicy that way. But bringing a whole bird can help it cook fast with juicier results. It’s up to you.
Here are some tips for brining a turkey:
- You'll want to brine it for a minimum of 12 hours but can brine up to 24 hours.
- Remove the hock lock which is the plastic thing holding the drums together. Although it's safe to cook with it on, I find it easier to remove the neck and the giblets before brining once the hock lock is removed (but don't dispose of them!).
- Be sure to cool your brine completely before submerging the turkey to avoid temperature fluctuations. I like to use a brining bag to keep my brine contained and fully submerged.
- Once you're done brining, carefully rinse the turkey (try not to have anything around your sink while doing this to avoid cross-contamination). Then pat the turkey dry with paper towel.
- An optional but excellent trick for crispier skin is to refrigerate the turkey after patting it dry to help the skin dry out even more. Less moisture = crispier skin.
- So the ideal timeline would be to prepare the brine 2 days before roasting the turkey.
- Day 1: Submerge the turkey in the brine first thing in the morning the day before roasting for at least 12 hours.
- Day 2: Rinse and pat dry before going to bed the night before roasting the turkey. This includes patting the inside of the carcass dry. Then store it in your fridge uncovered to air dry. Be sure to have nothing else around it (I place it in the pan you'll be roasting it in). Please note this step is optional as not everyone has that kind of fridge space available. If this is not the right option for you, you can always just brine it the day before and then rise and pat dry the morning you'll be cooking it.
How To Prep A Turkey
Since this post is about cooking the bird whole, these directions will be for prepping a whole bird (you can find cooking directions to make this recipe for a spatchcocked turkey in the notes of the recipe card at the bottom of this post.
Here’s how I prep this turkey recipe for roasting:
- Pull the turkey out of the fridge an hour before cooking so that it can get closer to room temperature.
- If your roasting pan doesn't come with a rack (or if you're the smart person who prioritizes the convenience of a disposable roasting pan over the pretty store-bought ones- more power too you) pop a metal baking rack into the pan before adding the turkey. This will help keep the bottom from burning and make it easier to remove the bird once he's cooked.
- Be sure to salt and pepper the inside cavity of the turkey for added flavor to the inside meat.
- To stuff or not to stuff? I am in the camp of not stuffing your turkey with actual stuffing for a few reasons (although you should totally make my delicious Cornbread and Sausage Dressing and serve it along side this turkey! Trust.):
- You need to also make sure that the stuffing comes to a safe temperature for eating or you'll risk getting food borne illness.
- Because of the last reason, you're much more likely to overcook your turkey if you stuff it with actual stuffing since you'll probably want to avoid the aforementioned food borne illness.
- That said, I still encourage you to place things like citrus, herbs, alliums inside the cavity. Just don't over stuff it.
- For the outside of the turkey, I went with a compound butter in this recipe to add great flavor and help with browning. You'll want to make sure you soften your butter in advance so that it's easy to work with. I just leave a stick out the night before.
- First, rub ⅓ of the compound butter under the skin, directly onto the turkey breast. Make sure you get all up in there. I'm serious. It's important to get all that delicious flavor onto the actual meat, not just the skin!
- I rubbed ⅔ of the compound butter all over the outside of the turkey.
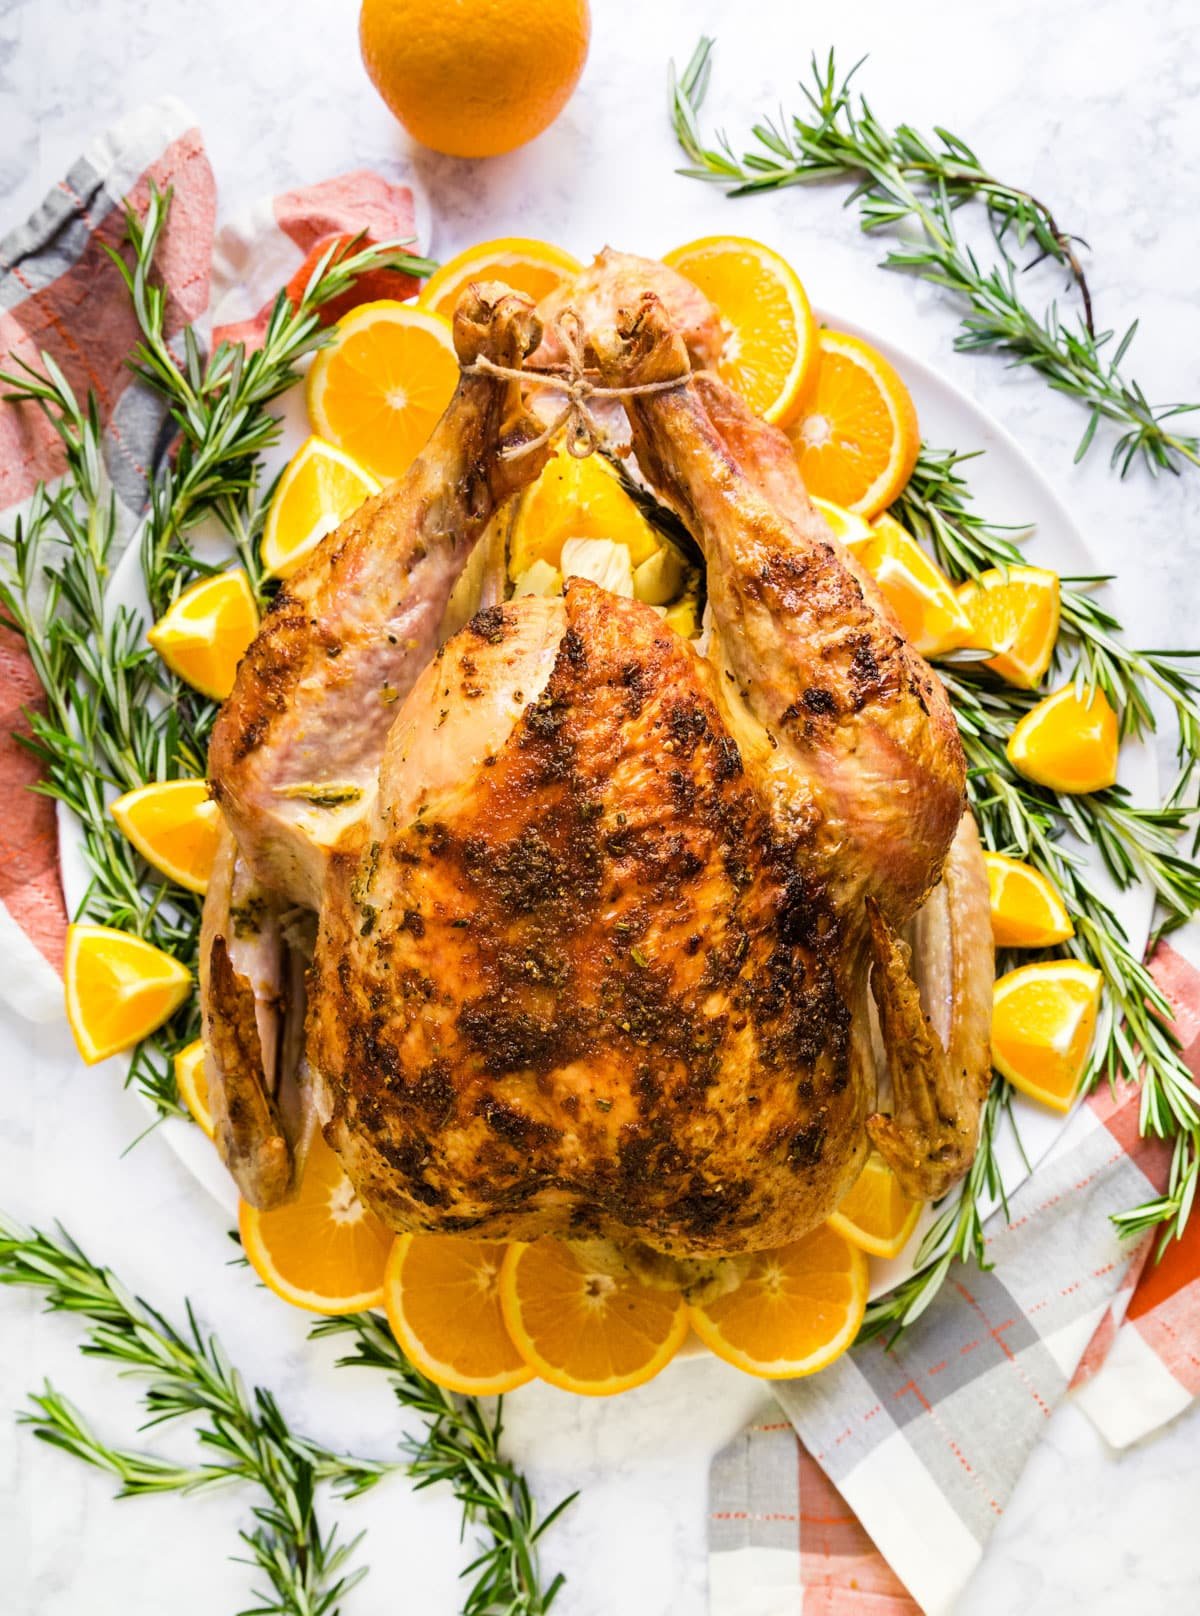
- Tie the drums together with a bit of cooking twine. I also tuck the wings under the turkey so they don’t burn.
- Place the neck and giblets into the bottom of the pan as they provide excellent flavor for the juices/gravy (in our family we also fight for the neck as the meat is fantastically tender).
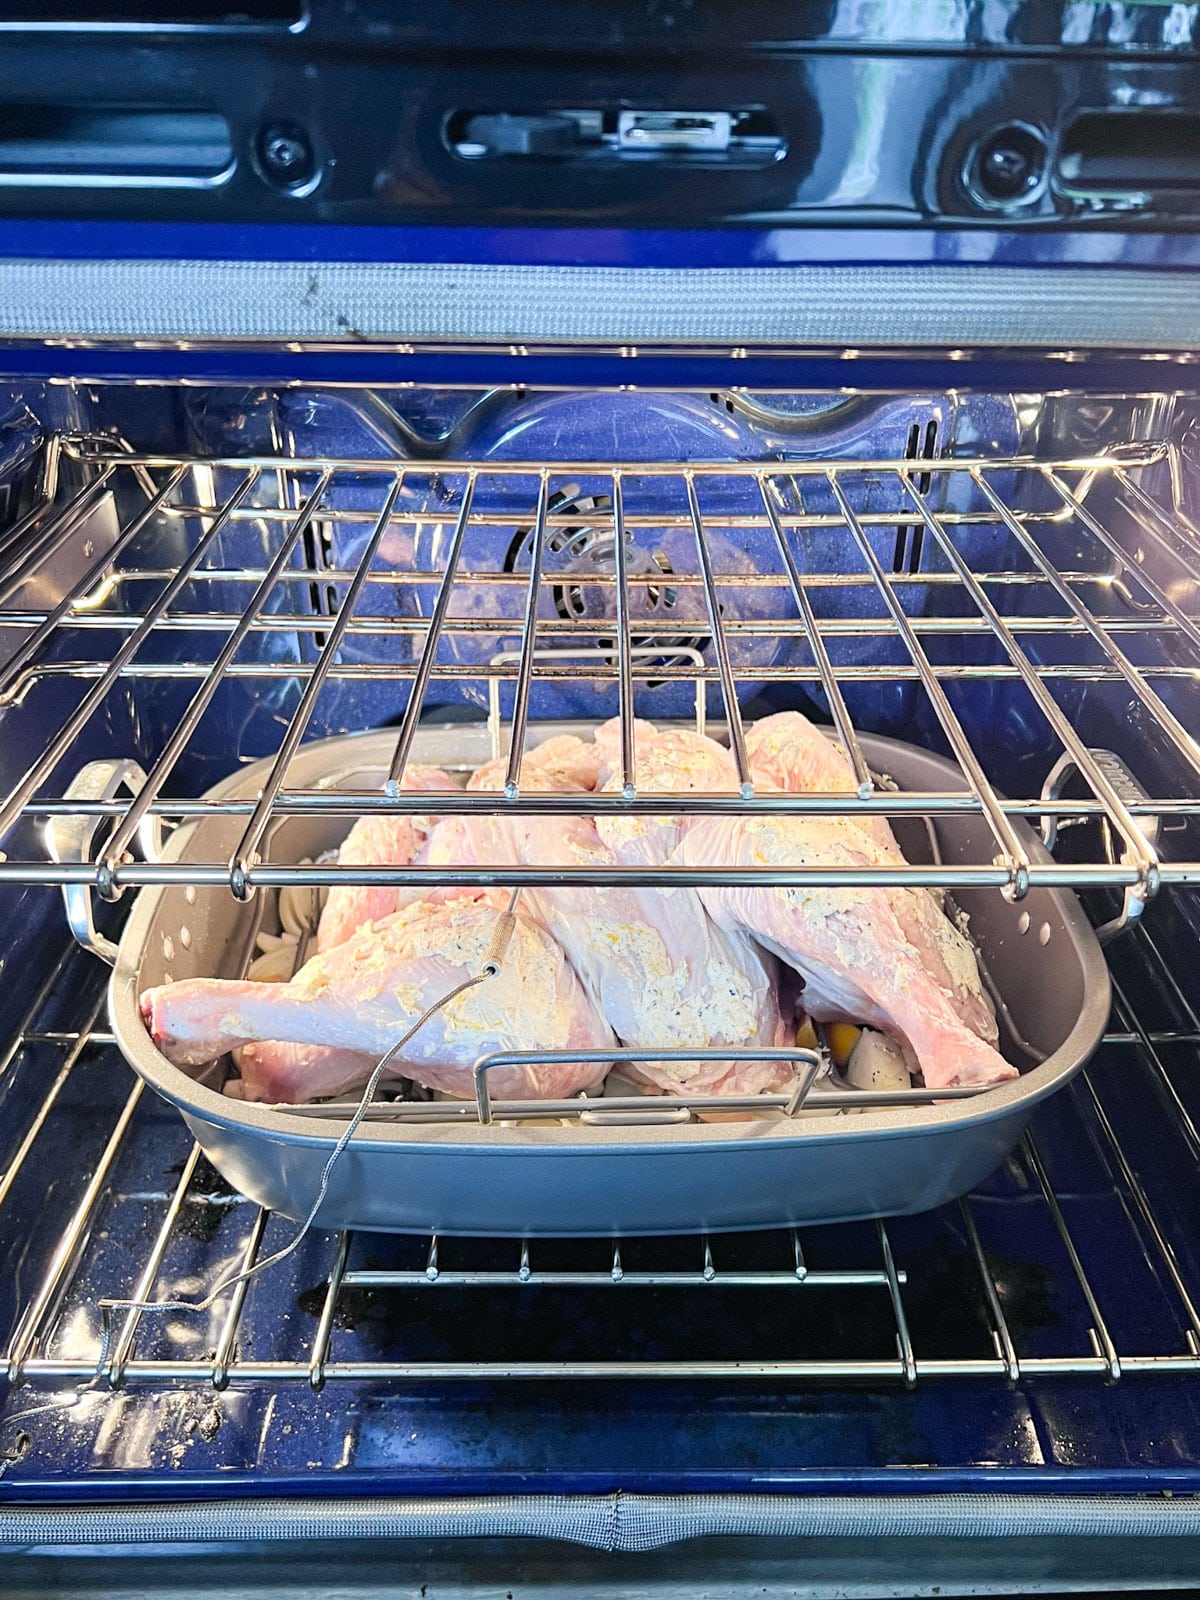
How To Slow Roast Turkey
When roasting a whole turkey, you'll want to start at a higher heat to render some of the fat out quickly before reducing the heat for the remainder for the cooking time. While it typically takes around 20 minutes of cooking per pound there can be a ton of variables that can change this, so my biggest turkey cooking rule is cook by temperature not by time for a perfectly cooked turkey.
Here’s how I cook my turkey:
- I start my bird at 450 degrees for the first 20 minutes and then reduce the heat to 350 degrees for the remainder of the cooking time.
- To get the right temperature, insert the thermometer into the thickest part of the thigh, near where the thigh meets the breast and push it into the thigh meat. Make sure you don't touch any bone (if you have a duel probe you can also place the other one into the other thigh). I also like to have a good instant read thermometer to double check but this is optional.. That said, don't rely on the pop up thermometers that come in the turkey.
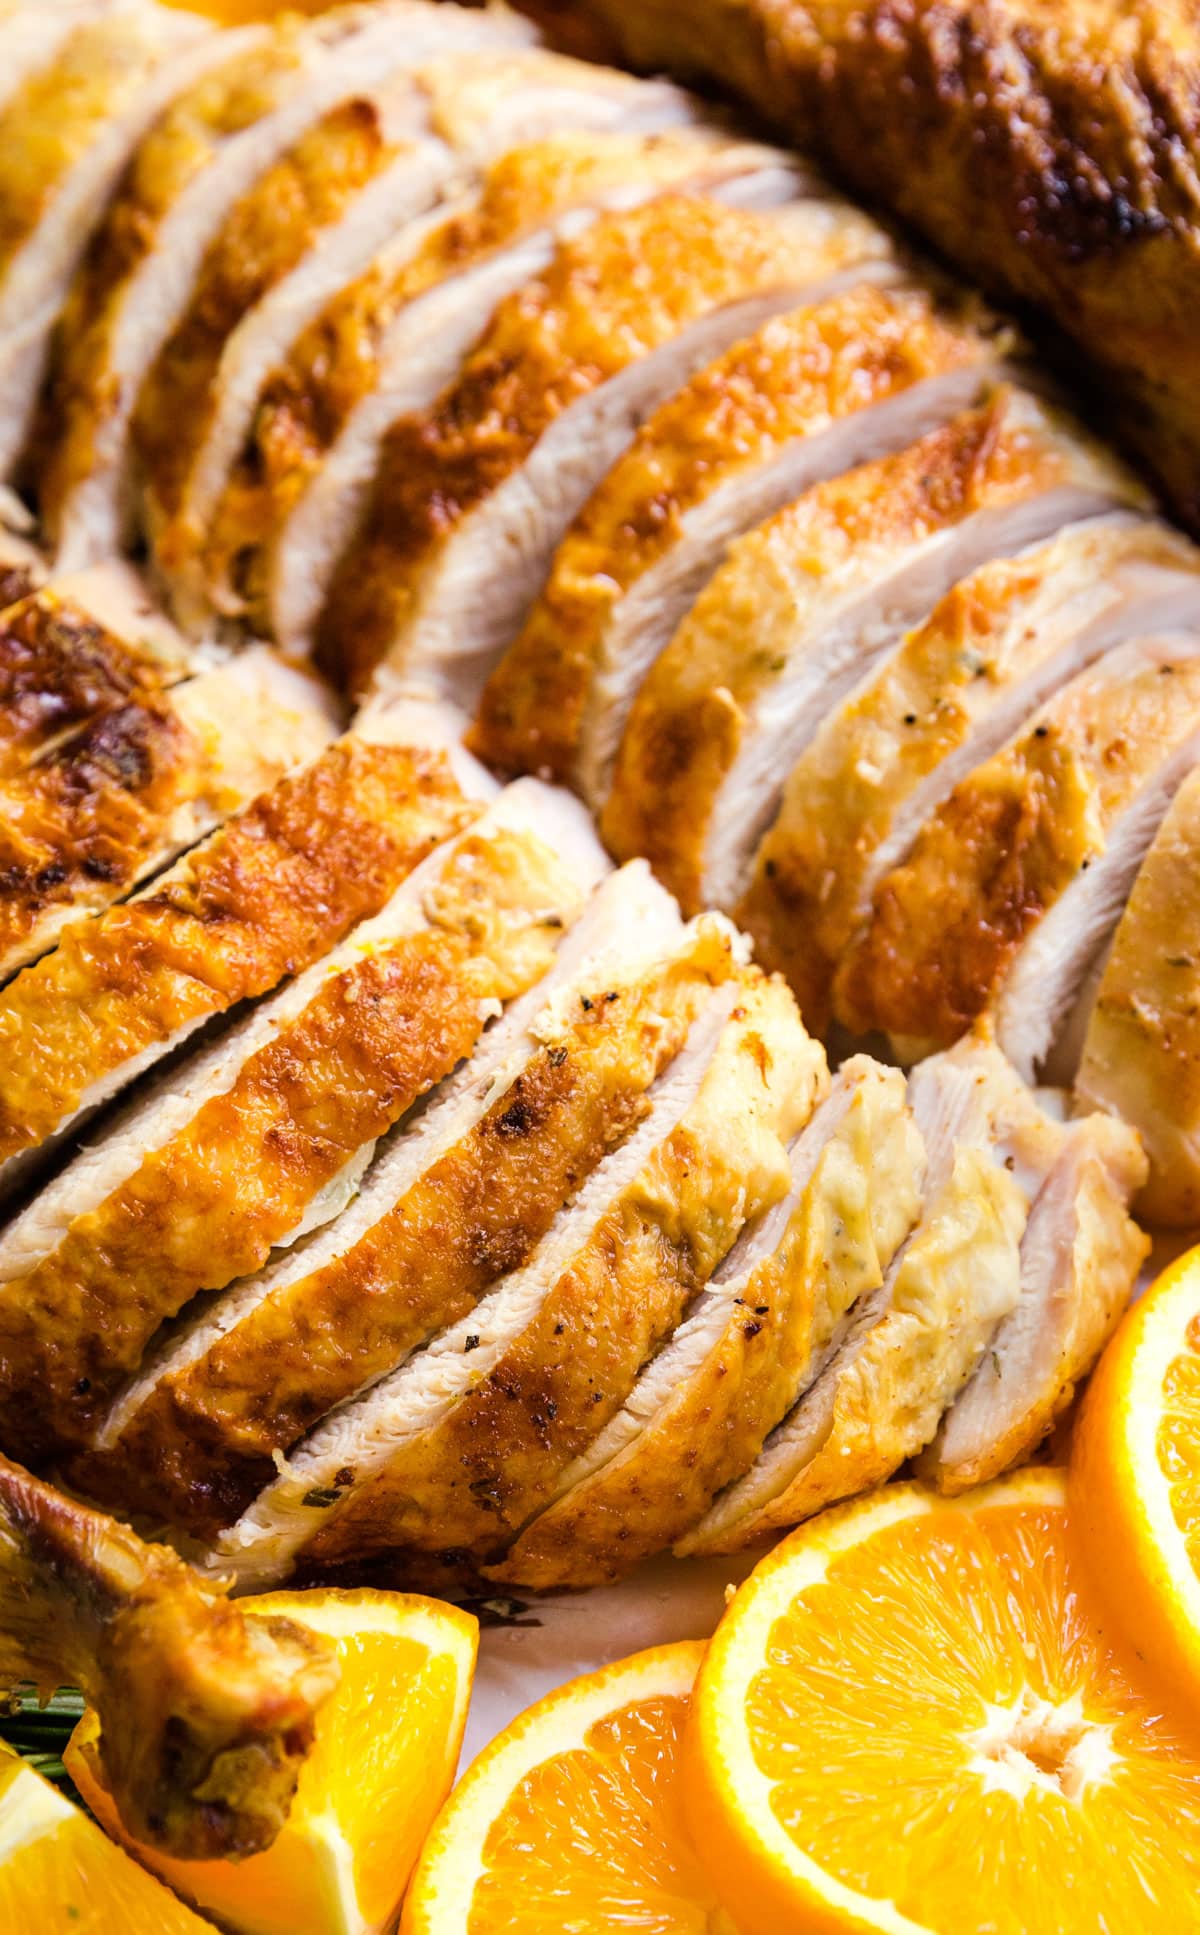
- To baste or not to baste? There are certainly arguments on both sides. I've done it both ways, but I haven't really been pulled strongly in either direction. The turkey in my images was not basted and as you can see, it has some gloriously crispy skin. At the end of the day, I didn't want to let heat out of the oven and have to extend my cooking time, so I didn't baste. But you do you!
- If the turkey breast is getting too dark too quickly (check it periodically) you can tent just that part with foil to help keep it from burning.
- I recommend pulling the turkey out of the oven at 161 degrees. While technically poultry is safe to eat at 165 degrees, it will continue to cook while it rests and get up to 165 degrees during that time while staying tender and juicy.
- Make sure you rest your turkey for at least 30 minutes to redistribute the juices before carving.
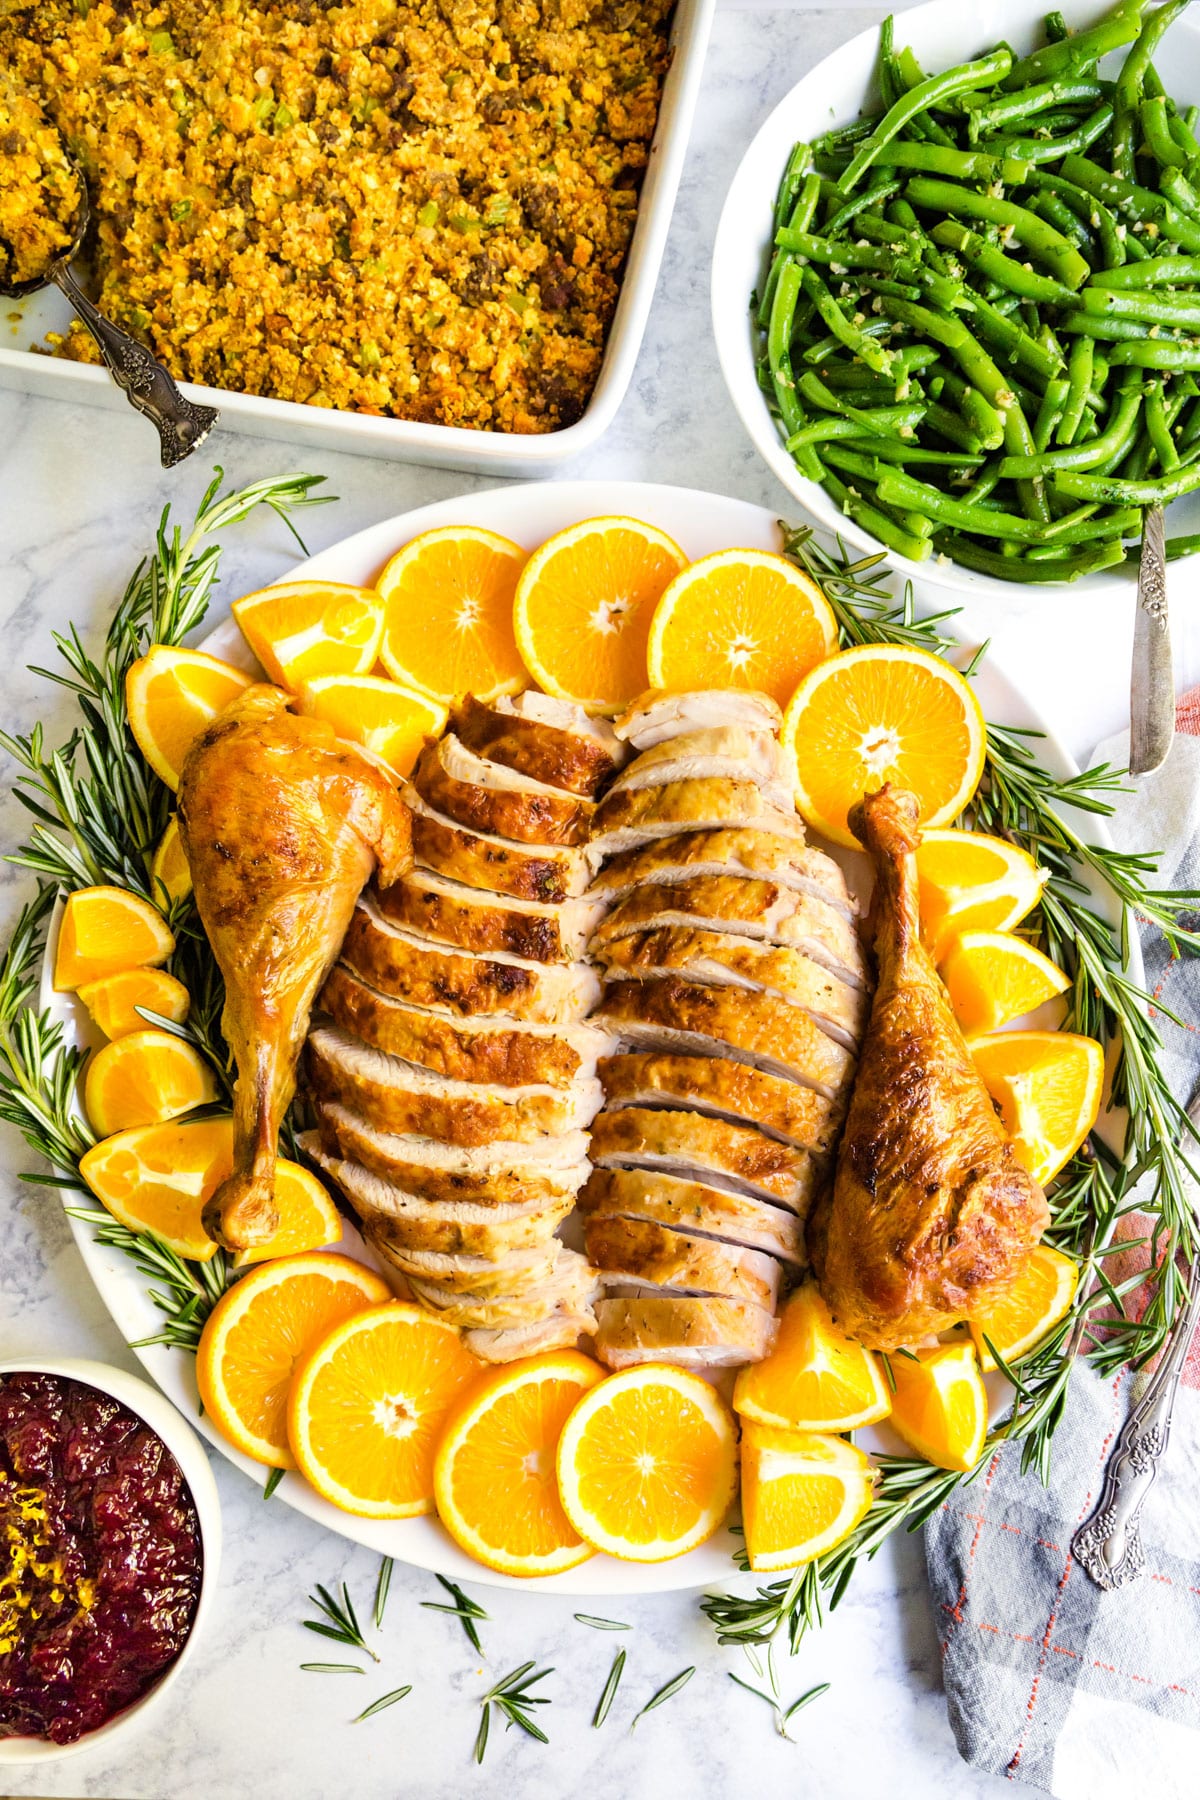
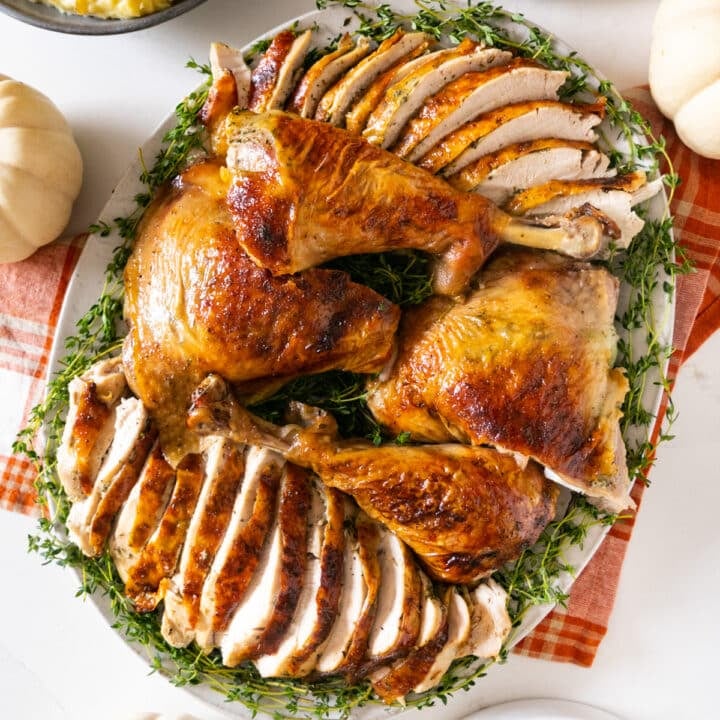
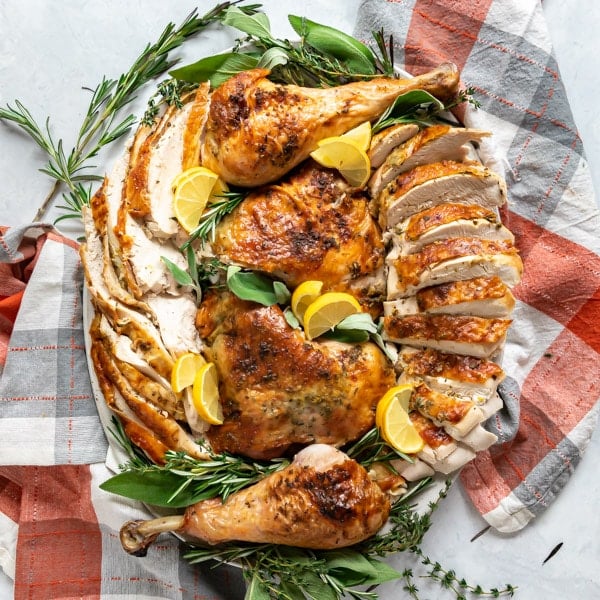
How to Carve a Turkey
This can seem intimidating but doesn’t have to be. When separating parts, it helps to find the joint for easier separating and be sure to slice meat against the grain.
Here’s how I break down my rested turkey:
- If possible remove the wishbone. You can find this on the wing side of the turkey under the turkey breasts. You'll slice on either side of it and give it a good yank to get it out. This is optional, but it makes removing the breast meat easier.
- Next slice through the skin connecting the leg and breast meat and pull the turkey leg down exposing the joint (use your muscles!!). Start with the tip of your knife and cut through the hip joint to remove the legs. Then you can separate the drums from the thighs by cutting through the joint that connects those and if you want, remove the bone from the thigh meat and slice it.
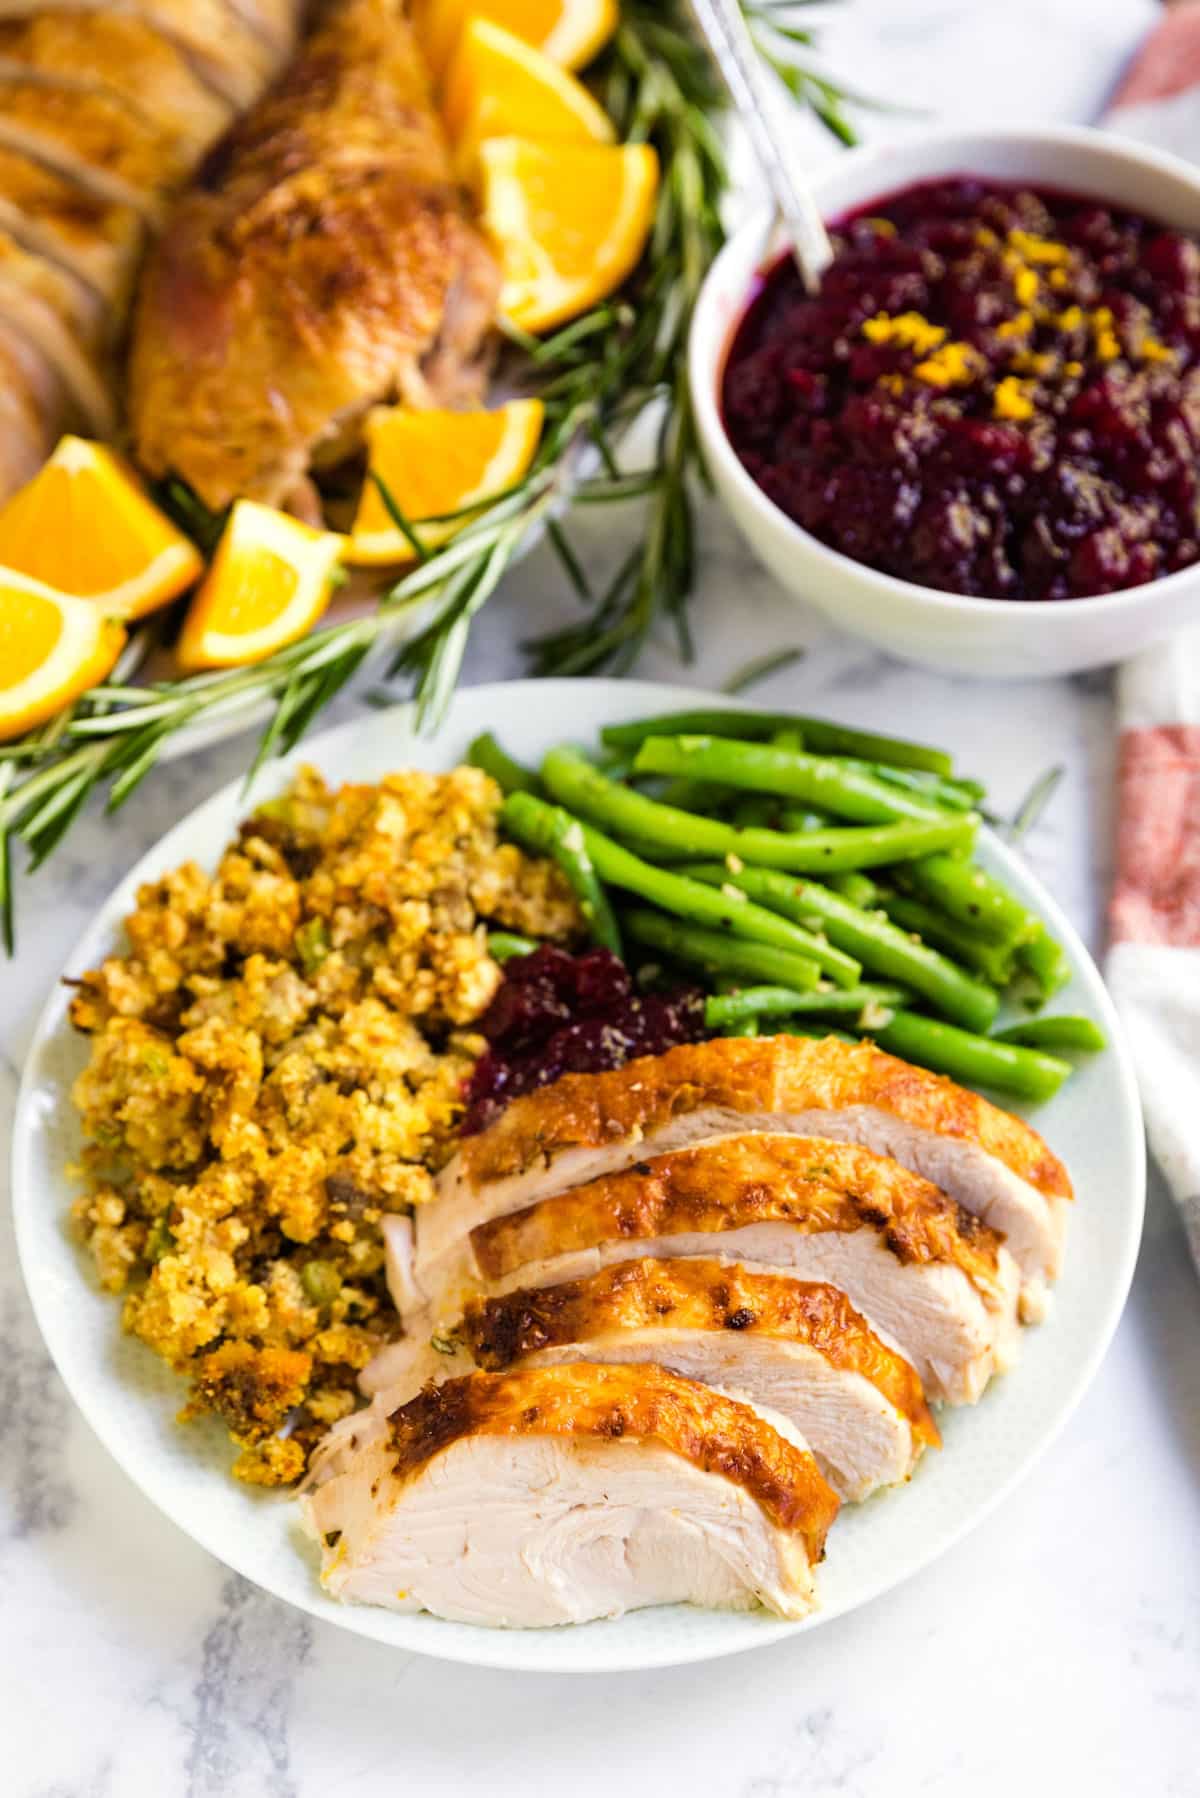
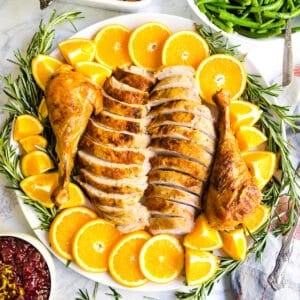
- Remove the breast meat in one piece by slicing down the side of the breast bone and peeling the breast meat down (go for longer strokes so that you're not sawing the meat). Then slice the breast against the grain from tip to tip.
- Pull down the wings to expose the joint. Cut through the joint and remove the wings.
- Be sure to save the carcass to make turkey soup and be sure to use all the pan drippings to make gravy (you can add additional store-bought or homemade turkey broth and thicken with a flour or cornstarch slurry on your stovetop. Be sure to use a fat separator first!).
Frequently Asked Questions and Turkey Troubleshooting
No problem, this will also work well with olive oil and add a another ¼ teaspoon of salt to the rub. It's a slightly different flavor but still delicious.
No biggie, it happens to us all from time-to-time! For the legs, leave the drums and thighs connected and either pop them back into the pan with the juices or braise them in the cooking juices in a large pan on the stovetop. For breast meat, I'd encourage you to leave that on the carcass, tent it in foil to prevent the skin from burning and pop it back into the pan. Either way keep an eye on it so that you don't accidentally overcook it! One thing to note is that breast meat tends to cook a little faster than leg meat, so you can always start with carved breast meat while the leg meat comes to temp.
I've got you! Submerge it (the whole turkey must stay fully submerged) in cold water, Throw a few ice cubes in so it stays below 40 degrees. Change that water every 30 minutes (seriously, set a timer!) planning on around 30 minutes per pound and then cook right away once thawed. Also, stir it once in a while while thawing.
It's ok, send your spouse or dad or someone equally as awesome to the store and have them grab a package of turkey thighs- my Roast Turkey Thighs for Two recipe can be ready in an hour!
It'll be ok! The dark meat is fattier and tends to be more tender so that'll probably be fine. As for the breast meat, cover it in pan drippings and turkey (or chicken broth) and pop it back into the oven for a few minutes. And then use plenty of gravy when serving.
What Do I Make With Turkey Leftovers?
These are some of my recipes that are made with cooked turkey and also chicken recipes that you can easily substitute cooked turkey:
- Turkey Tetrazzini
- Day After Thanksgiving Sandwich
- Copycat Panera Bread BBQ Chicken Salad
- Chicken Caesar Pinwheels
- Baked Buffalo Chicken Sliders
- Copycat Panera Bread Napa Almond Chicken Salad
- Buffalo Chicken Braid
- Rainbow Asian Chicken Salad
- Cheesy Chicken Taco Bowls
- Sheet Pan Chicken Nachos
- Chicken Salad Stuffed Tomatoes
- BBQ Chicken Flat Bread Pizza
- Homemade Chicken Noodle Soup
Other Delicious Roast Turkey Recipes

Hosting Thanksgiving?
Discover the secret to hosting Thanksgiving without all the stress! Prepsgiving is your FREE guide to making a delicious Thanksgiving feast the easy way.
Love this recipe? Please leave a 5 star ⭐️⭐️⭐️⭐️⭐️ rating in the recipe card below ⬇️ and/or a review in the comment section further down. Check out my Amazon Store for all my favorite tools, including those used in this recipe. And follow @thelifejolie on Instagram and TikTok!
Turkey with Oranges and Rosemary
Ingredients
Turkey Brine
- 2 gallons water, divided
- 1 cup kosher salt
- ½ cup brown sugar
- 2 sprigs rosemary
- 1 orange cut into eighths
- 1 bay leaf
Compound Butter
- ½ cup salted butter, softened (1 stick)
- 1 orange worth of orange zest
- 1 ½ Teaspoon fresh rosemary, chopped
- ½ teaspoon kosher salt
- ½ teaspoon black pepper
- ½ teaspoon garlic powder
- ½ teaspoon onion powder
The Turkey
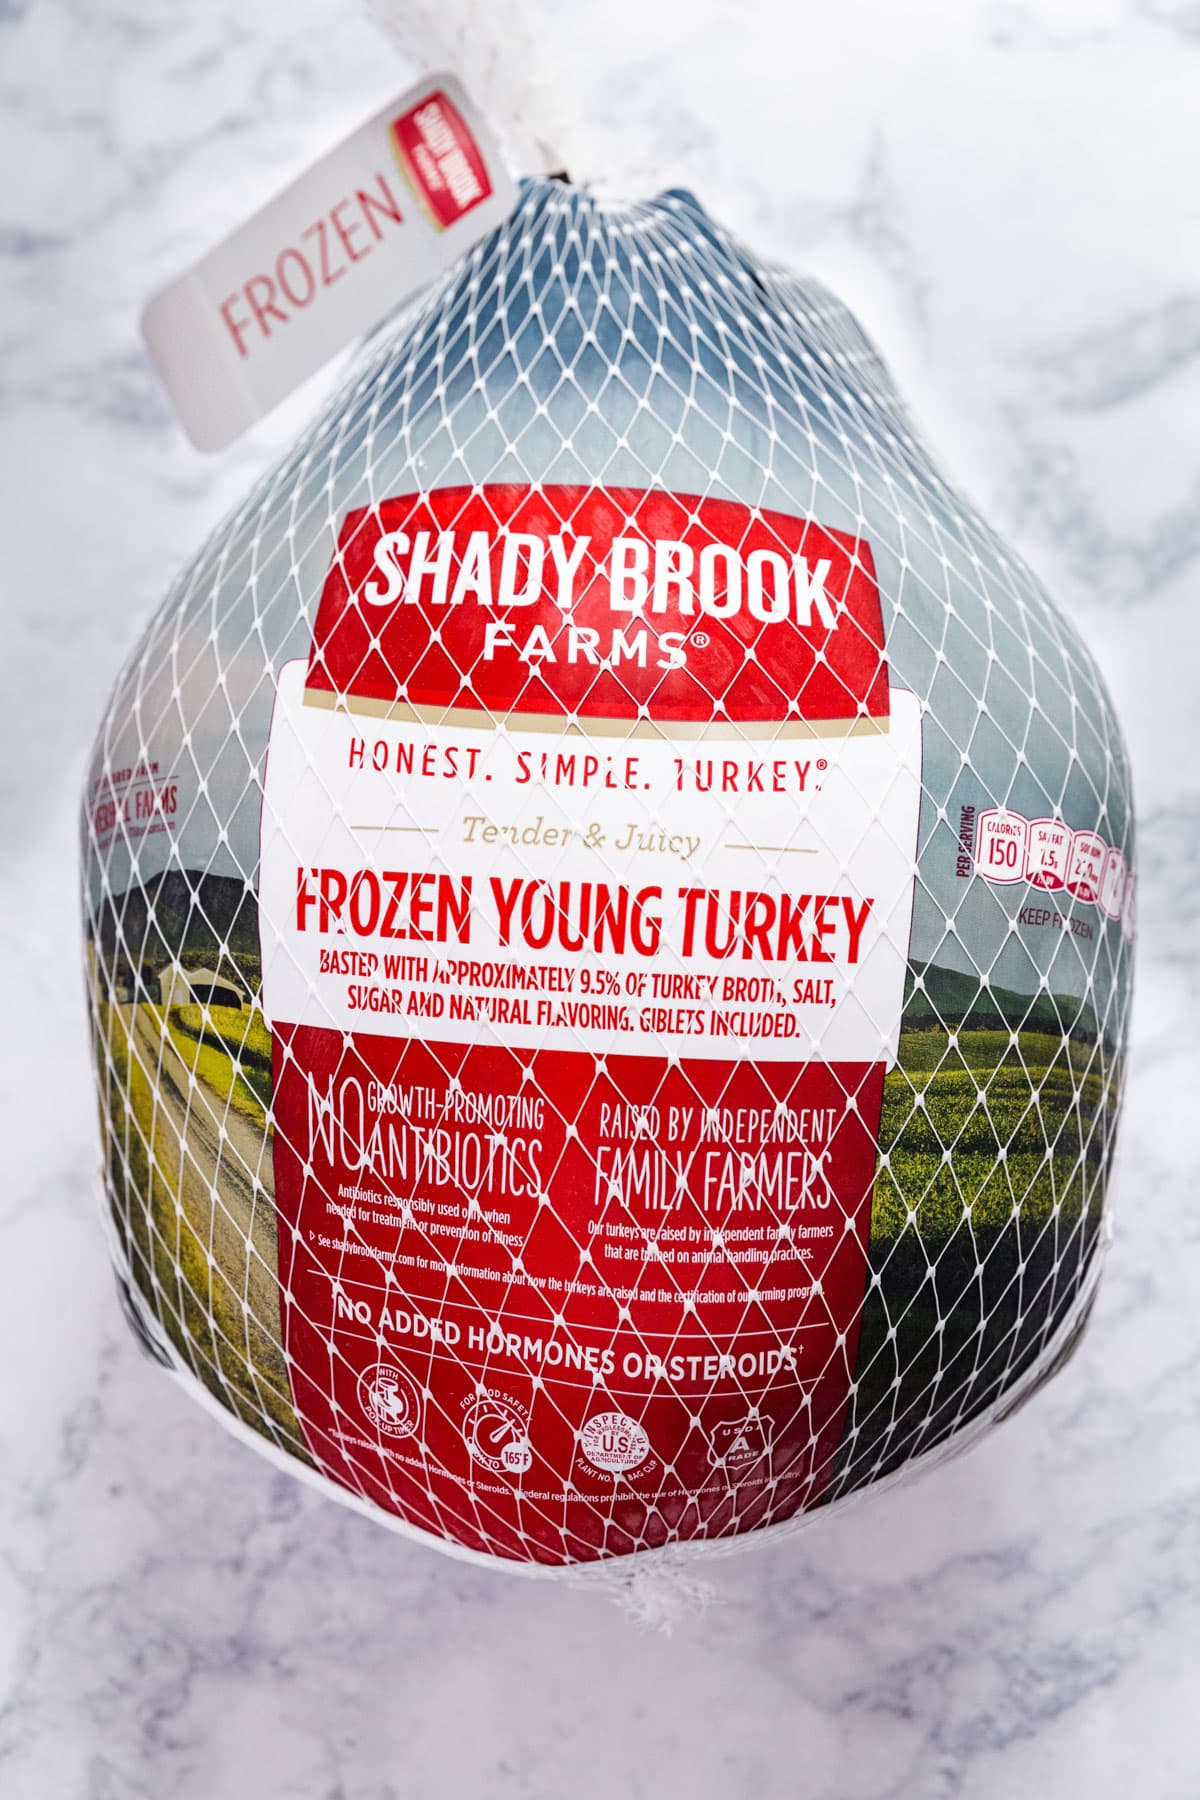
- 1 15 pound Shady Brook Farms Frozen Young Turkey
- Kosher salt and black pepper to taste
- 1 onion, cut into chunks
- 3-4 cloves garlic
- 1 orange, cut into chunks
- 1-2 large sprigs fresh rosemary
Instructions
Turkey brine
- In a large pot, combine 1 gallon water, salt, brown sugar, rosemary, orange pieces and bay leaf. Simmer until sugar and salt have dissolved and remove from heat. Cool completely.
- While the mixture cools, remove the hock lock and the pop up thermometer from the turkey as well as the giblets and neck. Keep the giblets and neck in an container in the refrigerator.
- Combine the cooled mixture with another gallon of water and submerge the turkey in this brine for 12-14 hours- be sure to keep it all in the back of the refrigerator so it stays at a safe temp (below 40 degrees F).
- When you're done brining, rinse the turkey and pat dry with a paper towel.
- Refrigerate uncovered until you're ready to roast.
- Optional: Finish brining and rinsing the night before and allow the turkey to sit in the refrigerator over night uncovered to dry the skin and promote crispier skin.
Compound butter
- In a medium bowl add 1 stick softened salted butter, zest of 1 orange, chopped fresh rosemary, salt, pepper, garlic powder and onion powder.
- Stir until well combined. Set aside.
The Turkey
- Preheat the oven to 450 degrees. Place the oven racks at the lowest level.
- Remove the turkey from the refrigerator 1 hour before roasting and give the turkey one more good pat-down with paper towel, both inside and outside.
- Sprinkle a generous amount of salt and pepper into the cavity of the turkey.
- Place onion chunks, garlic cloves, orange chunks and rosemary into the carcass, being careful not to over stuff it.
- Rub ⅓ of the compound butter under the turkey skin. Make sure you get all the way to the bottom of the breast meat.
- Rub the remaining compound butter all over the outside of the turkey.
- Gently tie the drumsticks together with a bit of butcher's twine.
- Place the turkey on a rack in the roasting pan and gently tuck the wings a bit under. Also place the giblets and neck into the pan.
- Insert the meat thermometer probe into the thickest part of the thigh and place the turkey into the oven and roast for 20 minutes.
- Reduce the heat to 350 degrees and roast until the internal temperature reaches 161 degrees, around 2-3 hours. If the breast skin is browning too quickly, tent it in foil.
- Once you've removed the turkey from the oven, rest it for at least 30 minutes before carving, reserving pan dripping for gravy. Serve immediately.
Video
Notes
- Skip the brining. Remove the spatchcocked turkey 1 hour prior to roasting and preheat the oven to 425 degrees.
- Prepare the pan as written above and rub ¼ of the butter under the skin and the remaining butter on all sides. Place in pan with the meat-side up and place the thermometer in the thickest part of the breast making sure not to touch the bone. Tuck the wing tips under the turkey.
- After 30 minutes reduce the heat to 375 degrees and cover any parts that are getting too brown.
- Cook until the temperature reaches 161 degrees (around 1 more hour) and remove from oven.
- Rest for 25-30 minutes, carve and serve immediately.
Leave a Reply